1 Aug 2013

Bridesmaids, Studio Blues and Desire Lines.

Howdy!

If I blogged more frequently, there would be fewer mammoth posts filled with too many photos about different unrelated subjects.  Alas, I prefer the mammoth approach and hope you all do also.

First, the bridesmaids dresses I've mentioned.  My brother got married a week or so ago to a lovely lady who also loves sewing (hooray!)  She had a vintage theme in mind for her wedding and I offered to help out with the dresses.  It was the first wedding I've been a part of and it was exciting to be involved!

It turned out to be an eventful day with a freak storm, power outage during the band's first set, down power lines, 150 people held hostage by the storm in a barn and things like that.  But above all of Mother Nature's shenanigans, it was a lovely wedding, the dresses and people's spirits were put to the test (sweat, rain, alcohol, etc) and it is an unforgettable story!

Andrea chose Butterick B5708 which is a reprint of a vintage pattern from 1953!  It was fun to work with and so pretty to wear.  She chose a pale blue cotton and a sheer polyester floral fabric to overlap the skirt.   Felt like a very full 50's party dress and fun to dance in.  Here's some shots of the dresses.  I'd love to post a more detailed shot of all us girls once the official wedding photos surface.  

For now here's a few:


A very focused maid of honour, and a nice dress shot.
Might I add, the church had no air conditioning and it was exactly 6000 degrees that day. She looks fabulously vintage.

Myself with the groombrother
You can see the sheer floral overlaying fabric here.  My dress was kind of stuck to me by this point but you get the idea.  


Blurry Bluebells in a Row

By using my vintage hem-marker from a few blogs ago, I was able to create that even hemline thing going on. Always mark from the ground up for an even hem! Very neat effect.

Tips for others looking to make garments for a group:

I found it best to tackle each one like an individual garment.  I think assembly line may have taken less time, but since each one required a bodice muslin and the pattern pieces to be altered for fit, it made more sense for me to treat them differently.

Give yourself lots of time especially to test and practice.  It's always a smart idea to test out the design on some scrap, not only for fit, but for technical issues that may come up (i.e. the Y-Seam blunder).  Practicing allowed me to screw it up a few times before the real deal.

Luckily for me I had a lovely bunch of girls to work with.  They were really easy going and had much faith in me but not everyone can be as sweet.  My advice is to just follow the pattern well and ensure fit by measuring bustlines/waistlines (or better, fitting the actual humans, along the way!).  If the dress fits well, even if not everyone is happy with the design, it will look great!

I found this very similar pattern online by McCall's (sans Y-Seam, with bust and back darts).  Must have been the hip style....Interchange-a-dress?  Wear it 5 ways! Now in Gingham!


Technical need-to-knows about this pattern (for sewing nerds):

  • Y-Seam in bodice front is tricky, I opted not to follow exact instructions.  Instead I turned to quilt piecing methods and found this useful for nice, flat Y-seams.
  • Like most commercial patterns there's about 2" ease built into bust and waist measurements so I sized down for a more streamlined look.


Next on the agenda,
I thought I'd post some things from my studio.  But wait, that's not sewing!  Actually it kind of is....my artwork and my sewing sometimes overlap and I suppose now's a good time to share it.  I've been missing my studio time lately working on other projects.

Here's my quaint space within Paper Box Studios.  My studio is in a neat old industrial building in Hamilton's east end.  Rumour has it they used to make paper boxes there.  I share the space with my friend Laura, she is much neater than I am.

Welcome to my organized mess! Everything is on display and has a place.


Did a makeover show declutter my studio? Nope that's just Laura's side. :)


Some closeups of my random collections.

I found this old pair of shoes on the train tracks behind the studio.

One of several cork boards.  This one's all miniature garment muslins/patterns...yep, thorough research.

House photos, old documents too nice to collage and the best scissors ever...No I don't give haircuts.

Map dork

Um..ART!

The next few are images of some of my sculptural work.  My work is pretty material-based, but I'm going to throw out some phrases that describe this work to lead your interpretation:

-championing common experience through miniature, parade-like banners 
-frail, delicate, floating remnants of the past
-clothing as a stand-in for people who aren't here or  representing those who have died
-unravelling of truths found in the past


Some new pieces in progress...These 2 are very tiny, about 3" across
Playing with light


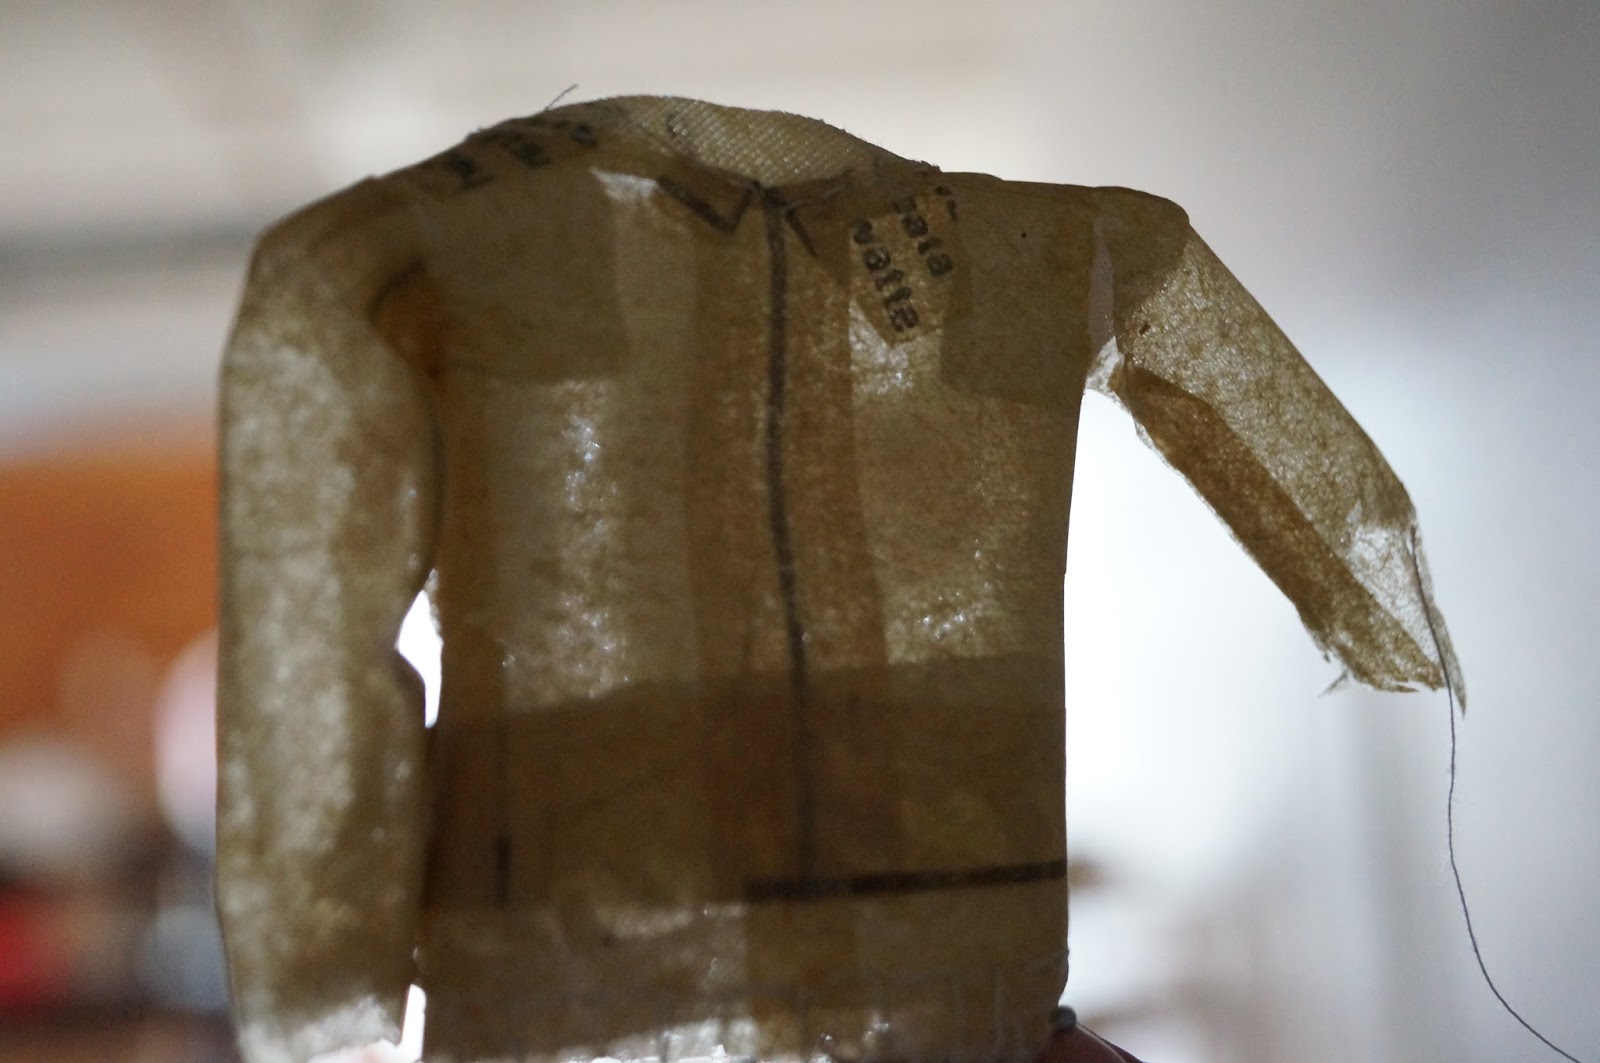
A sneak peek of an unfinished WWI uniform. This is miniature also. 


 This dress measure about 5" tall and the bodice is made from a real pattern that has been scaled down.  The materials include paper, wire, fabric and thread.

Close up of embroidery and sheer fabric collage on the skirt


That is all for now before this becomes  a novel.  There are some new an exciting sewing adventures to come that will be next on the agenda. 

I leave you with this song by a great band that I had the privilege of meeting a few weeks ago.
Desire Lines by Camera Obscura (with a glowing and 6 month pregnant Traceyanne)


Let's see where the desire lines lead me....

3 Jul 2013

Skinned Knees, Party Dresses and Nostalgic Love.

I've been meaning to post on here but I've been busy as a bee with bridesmaids dresses..soon!  3 of 4 done!

In the meantime, I dug up this lovely gem of myself and had an idea for a blog post.  (Not to mention it is a freakish match to the bridesmaid dresses..to come!)
This is me about 4 years old.  I specifically remember my mother taking this photo because I am wearing her dress from when she was a little girl.  The love of vintage dresses began early! (Note the skinned knees and bowl cut.)

Some specs on the dress:
c. 1959
Label: Baab by GK , which I've discovered was a Canadian manufacturer
Full skirt, with scalloped hem lining, puffed sleeves, tie belt and button back.  So sweet.

The best part: Here's the real thing!  The colour looks drastically different because I shot these in dim, dim lamp light. It's more like the photo above.

It is so very tiny, which is hard to tell here.

Need to use this technique!


I thought I'd add a few of my other vintage treasures, naturally they each have a story.


My grandma is a fashionable lady.

Here are some of her vintage goodies.

Red leather clutch (inadvertently highlighting my very own vintage-inspired bling.)


Made in Toronto!

Birdcage veil with a velvet bow.

Picnic blanket skirt and top combo.  This dress features a very full skirt and a crinoline (not shown since I have been laboriously replicating it in my sewing room).


Love vintage clothing tags.

100% great.

Embellished cashmere sweater.

Goes well with black and white combo above.

More!?

These lovely numbers were given to me after the passing of my cousin Laura.  We lost Laura to cancer last year.  She was one stylish lady with a love of vintage stores.  I miss our days costume hunting in Kensington Market. These two gems were just perfectly my size and I've worn the 1940s day dress plenty of times.  They are extremely well made and I cherish them both very much.  


My dear Laura in a dress I made for her starring role in Much Ado About Nothing at Fort York.


late 1950s silk 'mad men' dress.  Can't you see Betty Draper in this number?

Love the colours.


1940s 3/4 sleeve day dress, no label.  Layered faux jacket over silk polka dot dress layer.

Colour combination is exquisite.


The quintessential inner grosgrain belt.

Some things of my mum's
 The classiest of evening bags.
 Summery skirt and top.  Unfortunately the waist on this is like....23 inches!  Not a chance.
Back view of top...so cute!

Ok that is all for now.  I hope you enjoyed these as much as nerdy ol' me.

Drooling over dresses until next time.....


10 Jun 2013

Bridal Shower, Quilt- Handmade gifting and a Tutorial! Wow!


As promised to friends of mine wanting to see the finished product, this post is about the quilt I made for my brother and future sister in law's upcoming wedding.  They are getting married in July and today was the bridal shower.

The shower was a great success today and also exhausting. I nearly started this post with 'hello," because I thought it was an email...oops.

I think it's bedtime soon!

But first...

Here's the personalized quilt.  I used Thimble Blossom's Hopscotch pattern because I just loved it.  It's kind of modern and fun.  Also surprisingly simple to piece, but time consuming like all quilting.  I find it therapeutic.


I matched the colours to suit their tastes and used fabrics that were meaningful and fun.  The London print represents their time spent working in London, and also their honeymoon destination.


Detail of appliqued, embroidered patch with their wedding date.


My good friend Leslie helped me do the long-arm free motion quilting.  I had a lot of fun and learned how to tackle loop-de-loops on my own.

I loved how the overall pattern turned out with dark and light pieces.
I did several variations in photoshop beforehand, I find this really helps me lay things out before cutting.  It creates a map of what will go where.

Ta Da!  (And some Inspector Morse dvds.)


Once I was done it was time to wrap it.  I couldn't find a pre-fab box that was the right size or suitable so I decided to make one.

My art studio mate Laura is a sculptor of geometric objects like the one below, and she is a box making pro.  She gave me the idea to make the box and lent me her pro tools. (digital protractor, glue gun, cardboard). Thanks Laura.


After many sketches, I decided to make a simple round hat box and decorate it.


Here it is.  Covered with maps and wallpaper.


Curled strips of wallpaper added to the ribbon bow.


Side view, the colours on the map and floral print were a great match (and each reminded me of the bride & groom)

On my way to the shower!  Hey, that dress is familiar.


Here's a  hat box tutorial because it turned out so neat I want to share my fun:

It's fairly simple but effective.

Draft a circle of your desired size and cut two from sturdy cardboard.  (I used the pencil and thumbtack-on-a-string compass method for making a large 18" circle, but you could trace a plate or other object).

You'll need to know the circumference (C= πd  for a math recap).  Cut rectangular strips for the lid and side of box the length of the circumference.  For the strip width I used a 2.5" strip for the lid and 6" strip for the box side.  If you need a super long strip like I did, feel free to join two smaller lengths together to reach the circumference measurement.

The fun part: You'll need to score the strips so they curve around the circle.  The best way is using a cutting mat with a grid.  Lay out your strip so it's square on the mat, and with a ruler and exacto knife, gently score vertical lines every 1" along the length of the strip, using the grid as a guide for even spacing.  Using a bone folder or blunt scissors, score again along each cut, indenting the cardboard in a little and pressing fairly firmly.  This will allow for a smooth curve on the outer face of the cardboard.  Scored side will be the inside of the box.

Repeat for other strip.

For the lid:
Lay the strip on the table scored side up, and run a short strip of hot glue close to the top of the strip.  Glue the edge of the circle along the glue line.  Keep gluing, and rolling the circle to the right until the strip is wrapped around the circumference and outer edge of circle

For the bottom:
You'll glue the strip to the circle in a similar manner as above except the bottom needs to fit inside the lid and be slightly smaller around.  To achieve this, lay the circle flat and instead glue the strip around its circumference, but on the face of the circle, not the edge like above.  This will make the box slightly smaller and guarantee the lid will fit.

For both lid and bottom, join ends of strips where they meet with masking tape or more glue.

I covered the boxes using spray adhesive and paper maps/wallpaper and the bottom is fabric. Any of these coverings work well, as long as they aren't too thick.

 To achieve a smooth look, start by spraying and covering the circle top and then bottom before covering the sides.  The paper should be larger than the circle.  Once paper is adhered to circle, trim around leaving a 1" lip of paper.   This excess it will fold down and be glued to the side to form a neat edge.  Snip the excess 1" paper rim every inch , cutting toward the box and glue each 'tab' down onto the side.

Using rectangular strips  the same size as the original cardboard strips, glue paper onto sides of box and lid.

I coated the paper with a water-based varnish to protect it a little but that's optional.

You've done it!  If you're really ambitious, you could cover the inside also, or make different sized tiered boxes, or even an oval box.  

I apologize if those instructions are convoluted but I'm ready to crash any moment.

I'll leave you with a photo of the bride to be, in an apron covered in bows.

Ain't she cute?